
Showing posts with label knife. Show all posts
Showing posts with label knife. Show all posts
Friday, July 31, 2015
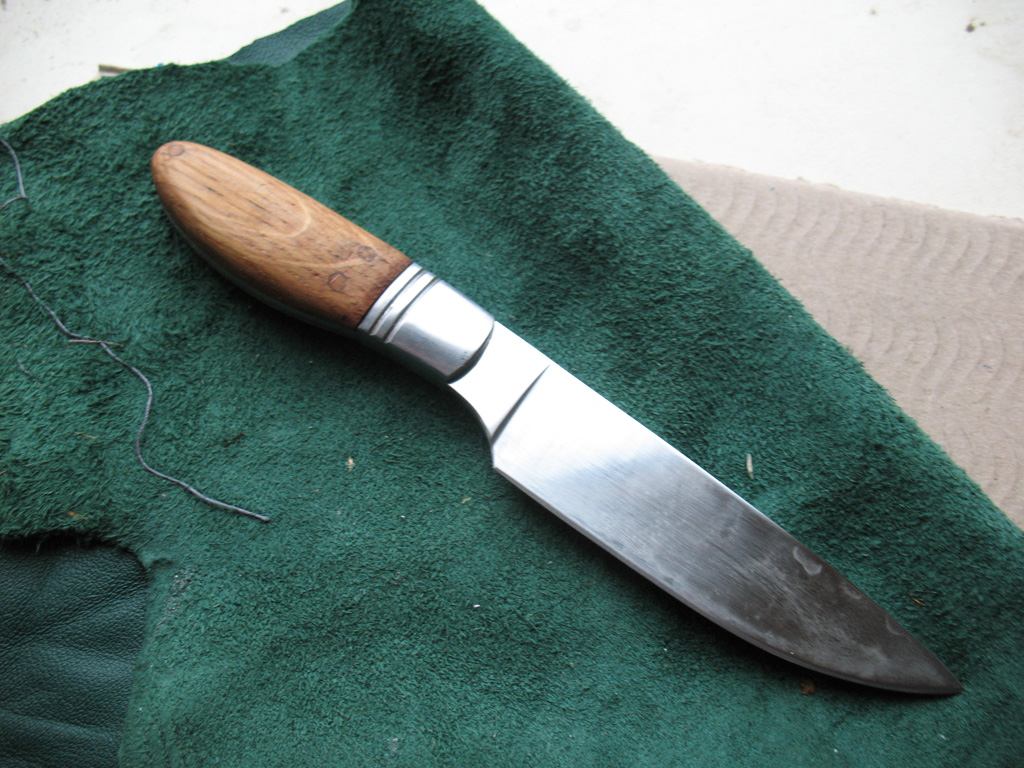
A Knife Handle
A friend asked me to put a wooden handle on this knife but keep the blade as it is (for sentimental reasons).

Friday, May 1, 2015
French Miner's Pocket Knife Part 4: Finished
Putting everything together is a lot of fun and also a bit nervewrecking as I have spent quite some hours on this one.


The spine is now flush with the handle and sanded smooth. Putting the blade on it requires putting tension on the spring (the spine) so that the blade can be locked open or closed. The last thing to do construction wise is to hammer the pins down. As it turned out I left the pins too long and bent the pins. Very disappointing but this is a lesson to remember for next time!
Now all there is left to do is coat the knife with linseed oil and it's done! The oil does a lot, it gives the grey-light color of the ashw ood a deep brown orange shine.
Later I sharpened the blade as well, it's pretty sharp. Really pleased with the result and will sure continue making some other french knives. Thanks for watching and enjoy the final shots of this knife.


Thursday, April 30, 2015
French Miner's Pocket Knife Part 3
The wood has cured to the stainless steel parts, now I have to shape the wood. I used a grinding disk and hand viles. The grinding disk goes fast but it burns the wood so I use it to begin with and finish with the hand viles. At a certain point you get closer to the metal parts and the two start to merge together. I then drill holes for the metal pins and I can now begin to test fit it together to see how the overall shape will turn out. It's still too thick, more wood has to be removed for it to fit nice and comfortably in my hand.


When I get close to the final shape I wet the wood and grain will show up and protrude, you let it dry and sand off the fibers that are sticking out for a smoother finish. From now on I can just use sandpaper. I'm not worried about the top part, the spine of teh knife, it will probably need some viling to get the metal spine to sit flush with the handle pieces.


In the next part we will put everything together and finish the knife with a coat of linseed oil.
Wednesday, April 29, 2015
French Miner's Pocket knife Part 2
The next step in creating the handle for the pocket knife was to glue the wood pieces to the metal pieces using epoxy. Then leave it alone for at least a day to fully cure.
In the meantime I etched a logo on the blade using electricity and an acid-salt solution. Nail polish is used to protect the steel and the logo was created by removing nail polish with a pencil or small scredriver.
I have seen knives that have the spine viled with decorative designs so I decided to give that a go as well. Carefully measuring the spine and putting marks where to vile. There's no "undoing" when you start this.
Next step will be to shape the handle and drill the holes for the steel rods that will keep everything together.


Tuesday, April 28, 2015
French Miner's Pocket Knife Part 1
I have done pocket knives before, usually american types and some fake french, chinese made Laguiole knives. But while searching for other knife kits I happily stumbled upon a french website that offered knife kits from various french regions. I like the designs, they look pretty solid, something worthwhile spending your time on making it. So I ordered some and this is the first one I'm showing. It is called a "miner's knife", it's very simple but good quality 12c 27 steel. First, the choice of wood, I had some ash wood still lying around and it fits perfectly cause I don't want a showy knife with expensive wood, I want it to look like a tool. Here's some photos of all the pieces after I roughly shaped the wood to fit the handle.


Saturday, April 6, 2013
New Try at Knife Handle
I've just finished another knife handle. It's a plain vegetable knife from the supermarket but this time it's all about the handle. Compared to previous ones this one is quite fancy. It has a wooden part and an epoxy part. Also known as Micarta in the business, I made this myself: layers of fabric soaked in epoxy create a wonderful and tough handle material, semi translucent like ivory or bone. Another first is the brass pin in the shape of a bullseye, layered brass and red plastic tubes fused together with epoxy. Hope you enjoy it.


Sunday, March 31, 2013

Monday, March 25, 2013
New Skinner Knife
Hi there,
Haven't had much time to update but here's some photos from a new knife I'm working on. The handle is made from chestnut wood I've been told, here being glued up ready for shaping and sanding. On the end of the handle is gonna be a brass pipe for hanging the knife with a piece of string or leather. Be sure to see how it turns out.


Haven't had much time to update but here's some photos from a new knife I'm working on. The handle is made from chestnut wood I've been told, here being glued up ready for shaping and sanding. On the end of the handle is gonna be a brass pipe for hanging the knife with a piece of string or leather. Be sure to see how it turns out.


Wednesday, December 19, 2012
Etching a Knife
I just came across this instructable here about how to do some simple etching on steel. The idea is to cover your knife blade or other piece of steel with nail polish, scribe a text or pattern in the nail polish and then using electricity etching the metal. Be sure to use a battery (9 volt) and for safety reasons, don't use any wall mounted power supply. This is really fun to do. To get more advanced you could try getting stickers made from your computer designed logo or illustration and use that instead of the nail polish for a real professional look.


Monday, December 17, 2012
Knife Update
Got my first knife handle done today. All in all not too bad but the nest one will definitely be better. It's made of oak with birch pins and soaked in vegetable oil. Not sure actually what you would use this knife for, maybe for cutting cheese?

Thursday, December 13, 2012
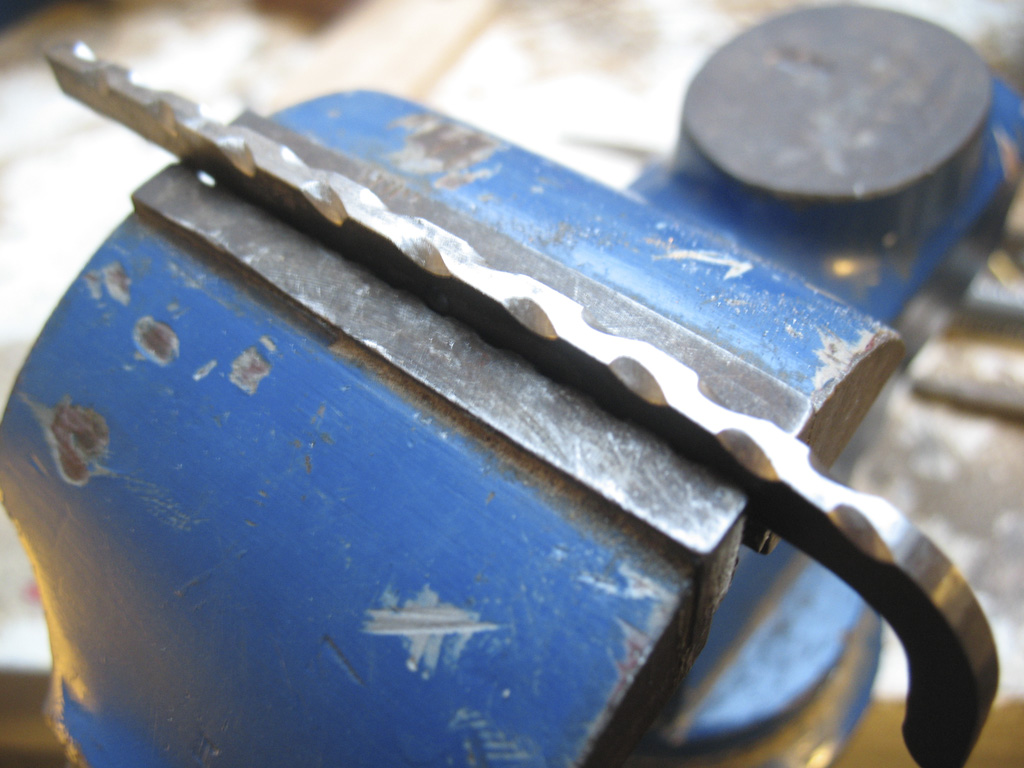
Getting Serious About Knives
I've been trying to make handles for a couple of household knives and found it both a lot of fun and very frustrating. Since I'm completely new to this it's obvious I will make mistakes. Nonetheless I feel I have to get it right this time since I have now a professional looking knive, imported from the USA, with a 1/8th inch thick blade, not like the flimsy kitchen knives I used before. Here's a picture of what I have sofar. The idea is to glue the handle in place with epoxy and hammer 3 wooden pieces of round wood through the holes at the same time, that should keep it all together. Then file down the sticks flush to the handle. There's a lot of stuff to keep in mind; don't spill any glue, don't hammer the wooden sticks to pieces and make sure it all lines up. And also, try sanding stainless steel when you make a scratch, its a pain. If anyone has any hints let me know.


Subscribe to:
Posts (Atom)